Why Connect Olark to Slate?
There are many reasons why you should integrate Slate and Olark. Here are the highlights:
- Measuring effectiveness. With Slate and Olark working together, you can measure the effectiveness of Olark and gain insights that will help you increase student engagement and service.
- Saving your team time and providing better service. Avoid extra clicks and automate repetitive tasks. Out of the box, Olark passes along a link to Slate student records for existing students in Slate, and your Olark account manager can help you unlock additional capabilities: route based on the content of the conversations, automate FAQs, and make sure students questions are routed to their admissions counselor when they are available.
- Better lead capture and lead scoring. Data from Olark can both help increase the lead score of highly engaged students and help add prospective students that are asking questions to the top of your funnel.
A successful integration will help your team be more effective, provide tactical tools to help you increase enrollment yield, and give you strategic information to make long-term decisions around maximizing yield with chat.
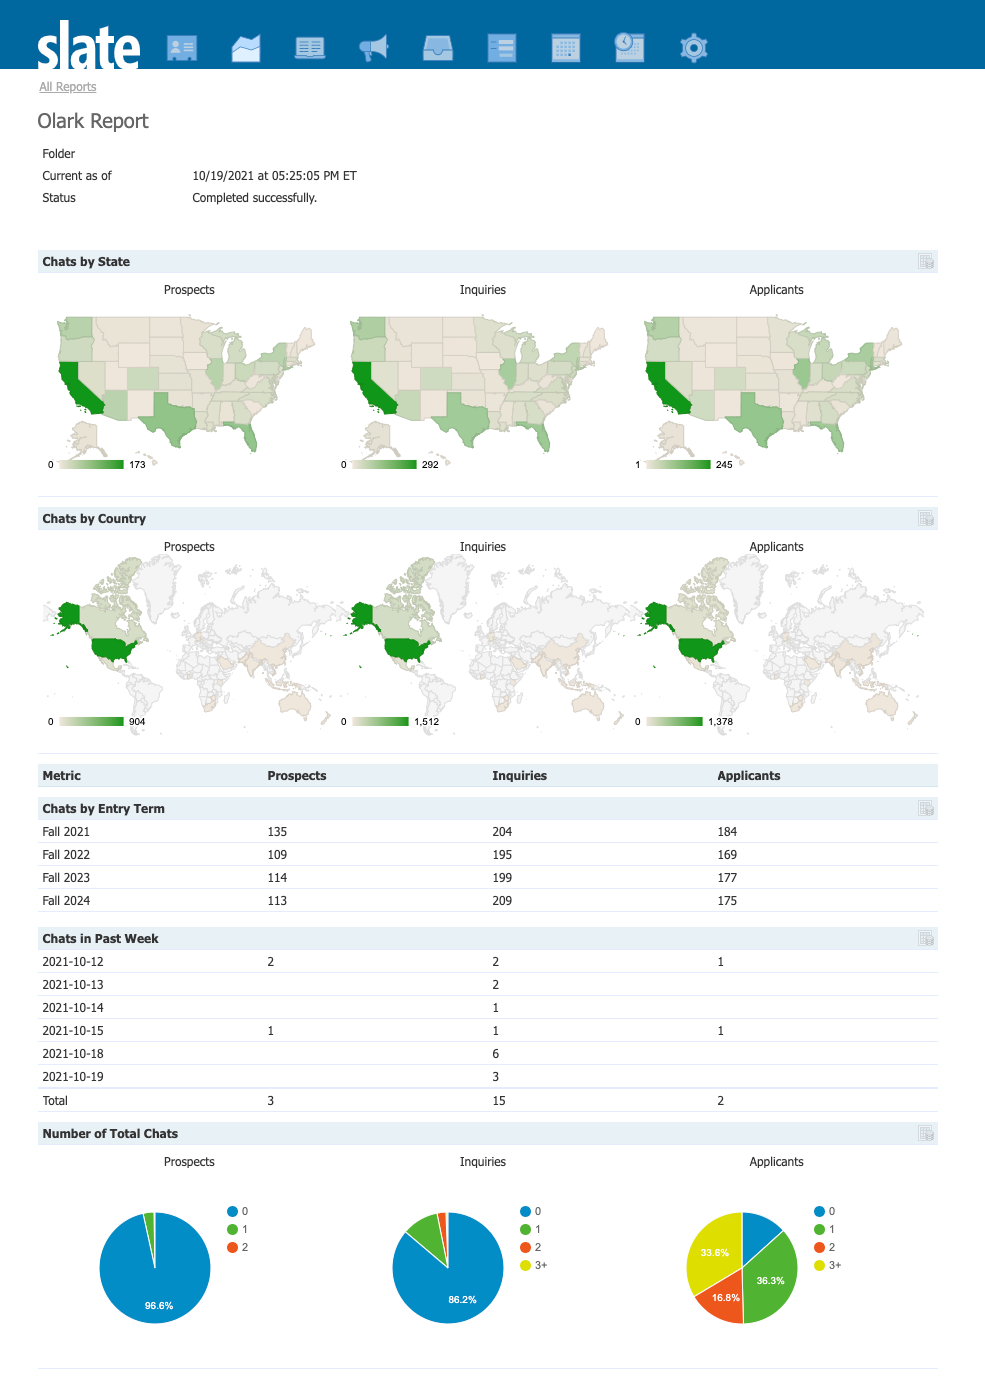
Here’s a realistic view of what someone could do with an Olark report in Slate. (Data is made-up data from one of our partner schools):
How to integrate
Most of our partners have Olark running with Slate in their test environment within a day of involving their Slate/CRM administrators and go live in production within 2 weeks. An experienced Slate administrator can set up the integration in between 1-4 hours, including all coordination with Olark.
Note: This integration requires anOlark Pro account.
We recommend starting simple and then expanding with more customized functionality. If you need more guidance, your account manager can talk you through the pros and cons.
We recommend completing these steps once with your test environment, and then once again in production once you are satisfied with the integration.
To ensure you are working with relatively recent data, it might help to update your test environment with the latest data from production before getting started. If you are unfamiliar with this step, we’ve added a quick tutorial at the end of this document.
This guide will prompt you to create username/passwords in Slate twice (once for the data query and once for the data importer that we post to). You will need them to use the same username and password each time instead of making two different usernames/passwords.
Step 1 - Create a new interaction type called “Chat”
Start by creating a new category of interaction with students. Slate calls each category of interaction an “interaction code”. We’ll associate all the Olark interactions we push into Slate with this interaction code.
It’s good to get this out of the way as it can take some time before Slate shows these fields as an option in Remap.
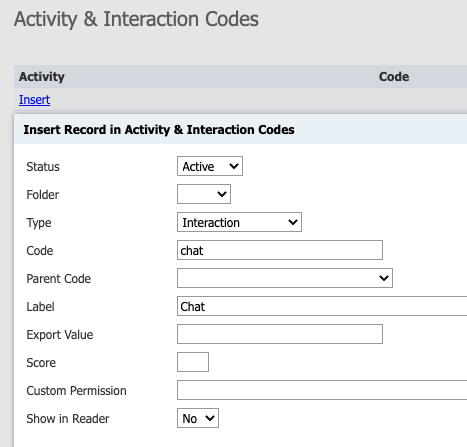
Create an interaction code for chat :
- Go to Database and select Activity & Interaction Codes.
- Click “Insert”.
- In the popup, choose the Code “chat” and Label “Chat” for your interaction code, and then save.
Step 2 - Create a username and endpoint so Olark can give agents a link to information inside Slate
Save time for your Olark agents by adding links to Slate user context directly in their Olark chats. This endpoint will also be used in the future to extend Olark with more automations, including taking an email address provided in Olark and matching it with a record in Slate.
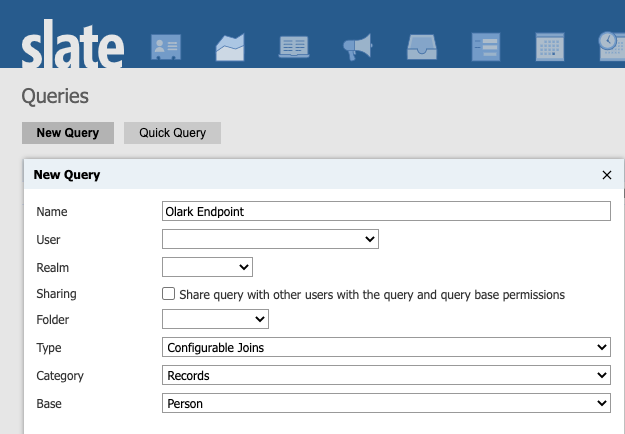
Creating the query endpoint :
- Go to the Queries page.
- Click the New Query button and create a new Configurable Joins query with the Person base.
Make sure the User, Realm, Sharing, and Folder settings are appropriate for your instance and business practices. These settings determine how your query is shared/displayed to other Slate users. We’ve included possible settings, but how you set it up may vary slightly, depending on your school’s way of organizing folders and permissions.
-
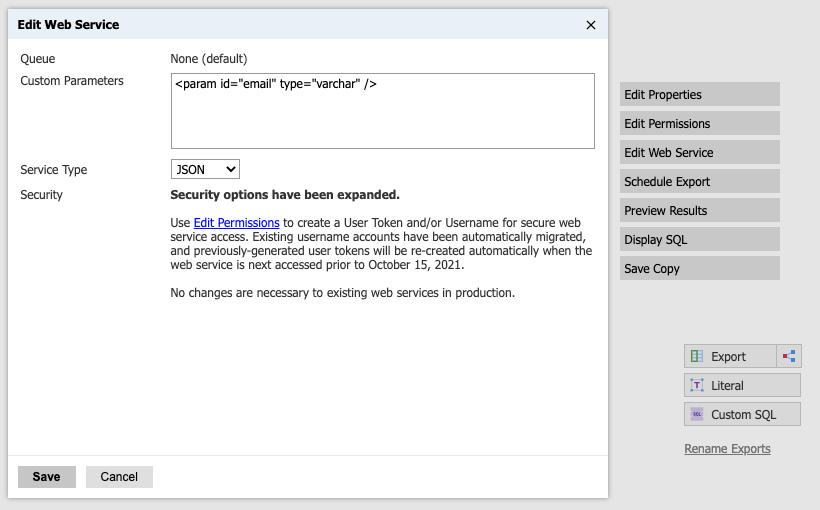
Click the Edit Web Service button.
-
Add the following custom parameter:
-
Select JSON as the Service Type and then save.
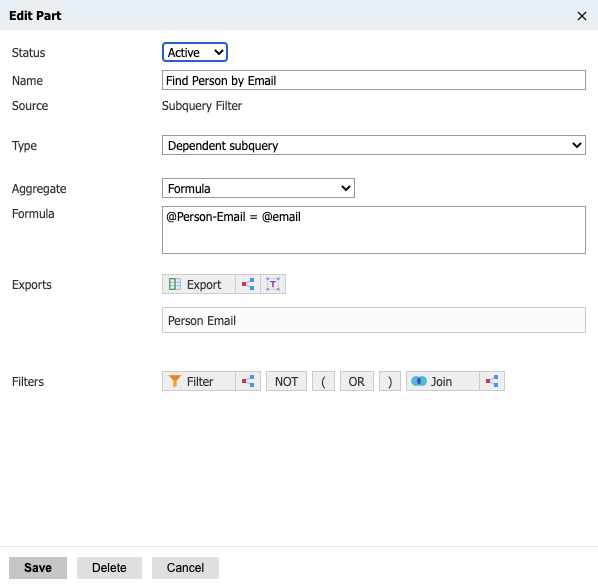
- Add a subquery filter, symbol as shown:

- In the Aggregate dropdown select Formula.
- Add an export for Person Email: This formula will take the @email parameter (provided by Olark) and match it to any record in the system with that address as their rank-one email.
- Enter @Person-Email = @email in the formula box.
- Click Save.
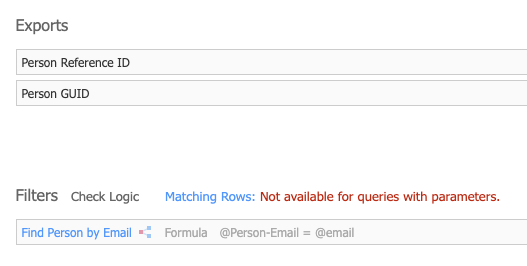
- Add two Exports: Person Reference ID and Person GUID.
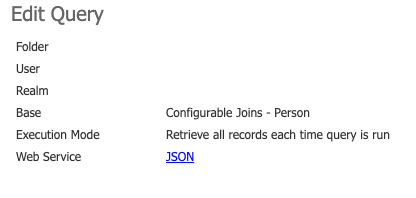
Your final query should look like this:
Create a web service username to give access to this query :
- In the Olark Endpoint query you just created, click the Edit Permissions button and then Add Grantee.

- Set the type to Username.
- Give it a name, username, and password (we recommend calling it “Olark” as the name and something like “olark-slate” as the username). You’ll need to provide the username and password to Olark later.
- Make sure to check the Web Service checkbox before saving these settings.
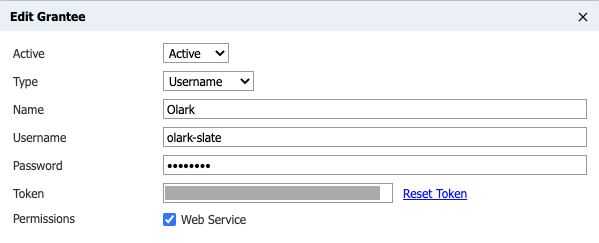
- After saving, close Edit Grantee by clicking the X.
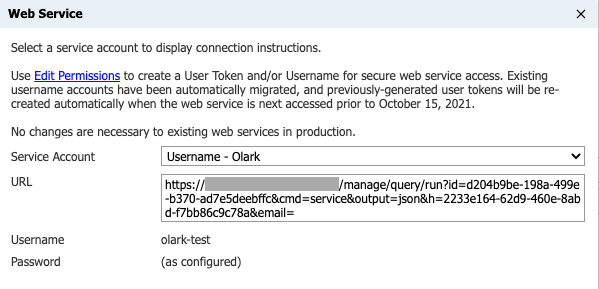
- Back in your query, click the JSON link in the top left.
- In the popup opened by clicking the JSON link, choose the Service Account in the dropdown that you just set up. Copy the URL to give to Olark.
To send Olark the credential information, contact your account manager to set up a secure transfer.
Step 3 - Configure your Olark Import endpoint inside of Slate
Now you’ll want to define where your Olark data will live inside Slate. In Slate: - Go to the Database page and choose Sources / Upload Dataset - In the sidebar, select Source Formats and click the New Source Format button
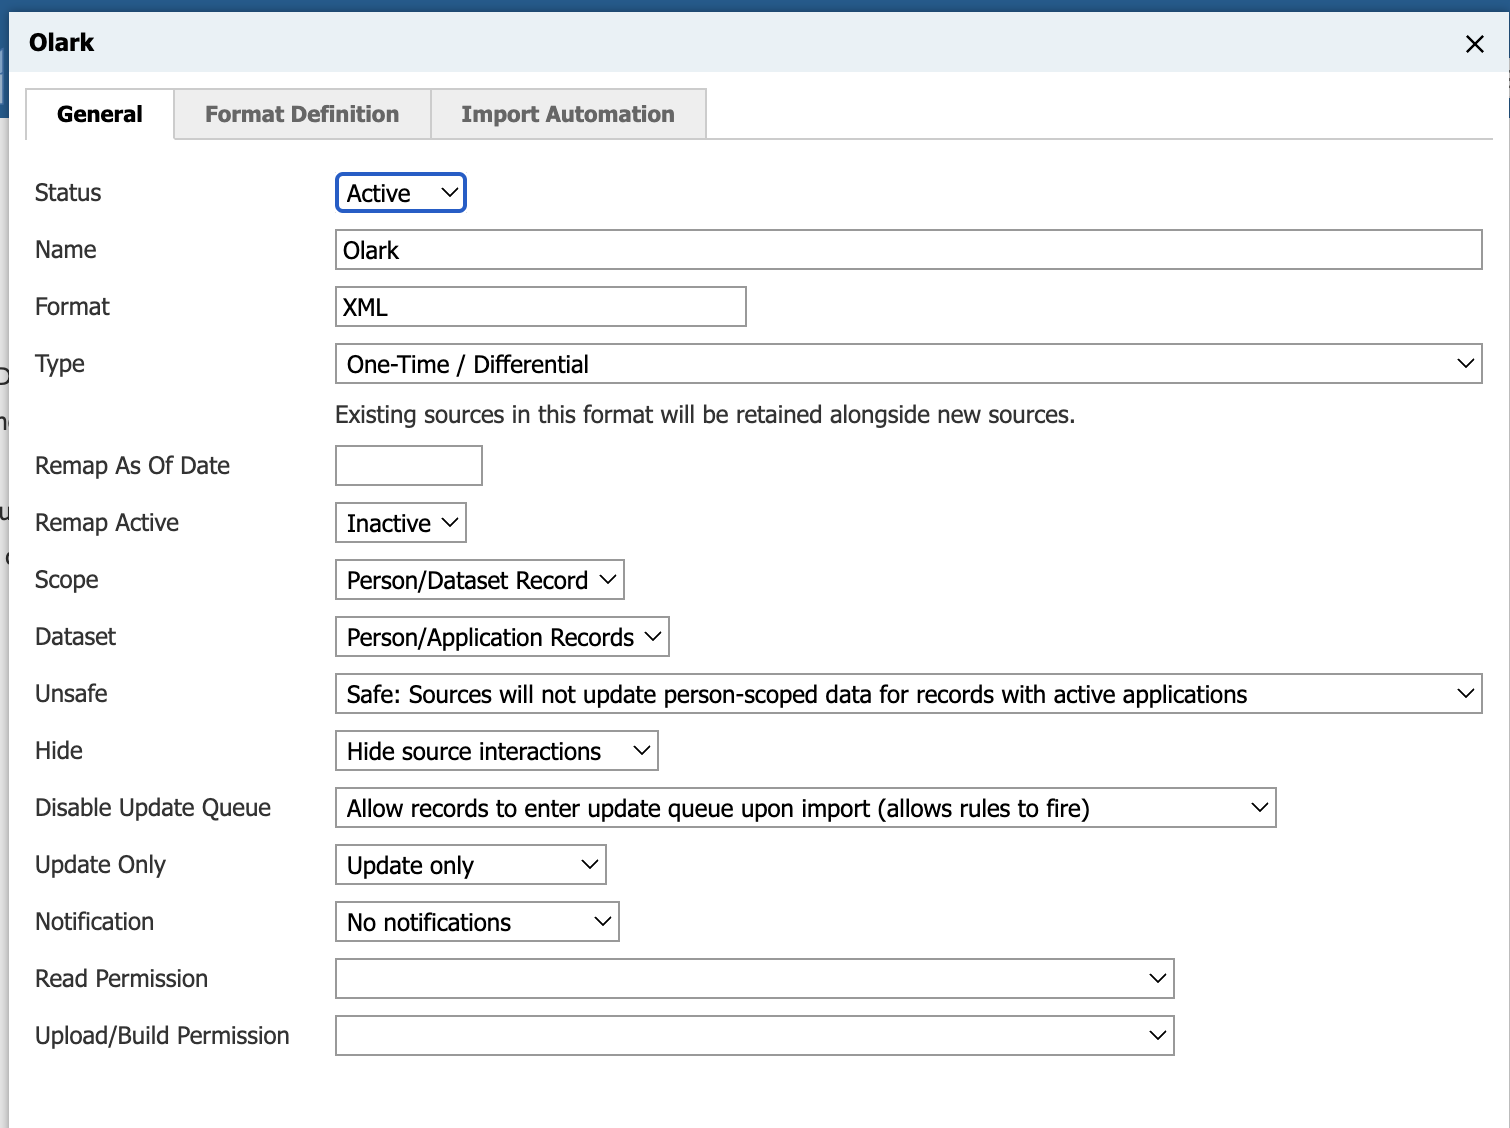
- In the popup, use the following settings in the General tab. Make sure to follow them exactly. (See screenshot below for how they appear on the page.)
- Status: Active
- Name: Olark
- Format: XML
- Remap As of Date: Today’s Date
- Remap Active: Inactive
- Replace Existing Datasets: Inactive: Files are ad-hoc
- Scope: Person/Dataset Record
- Unsafe: Safe: Sources will not update person-scoped data for records with active applications
(This import will still add interactions to records with active applications! However, since it’s not adding or modifying any biographical information, it’s better to leave it as a Safe import.) - Hide: Hide source interactions
(Olark will add a source interaction every time a student initiates a chat, in addition to the user-facing Chat interaction. You can choose not to hide the source interactions if you prefer to see them in the Interactions section of the timeline.) - Disable Update Queue: Allow records to enter update queue upon import (allows rules to fire)
(Allow rules to fire if you use rules for functions like interest level or lead scoring.) - Update Only: Update only
- Notification: No notifications
- Read Permission: (leave blank)
- Upload/Build Permission: (leave blank)
In the Format Definition tab, paste the following code into the XML box:
<layout type="xml" node="/interactions/interaction">
 <!-- only visible when we can find the student email address -->
 <f id="Student Slate ID" s="slate/PersonReferenceID" />
 <f id="Student Email" s="visitor/emailAddress" />
 <f id="Student First Name" s="visitor/firstName" />
 <f id="Student Last Name" s="visitor/lastName" />
 <f id="Operator Email" s="operator/emailAddress" />
 <f id="Interaction Start Timestamp" s="timestamp" />
 <f id="Interaction Subject" s="subject" />
 <f id="Interaction Body" s="body" />
 <!--TODO: consider adding additional fields for tags and chat feedback -->
</layout>
Note: There is more data passed into Slate from Olark than shown in the above mapping template. This should get you started, but to optimize for your use case, talk to your account manager.
Step 4 - Create secure remote access to your import endpoint
Now you’ll connect your import endpoint to a new service account for Olark. The service account will be used to push data automatically into Slate with a 15-minute delay after a chat is complete (this 15-minute delay is based on your Slate import settings for web services).
- Go to the Database page and click User Permissions
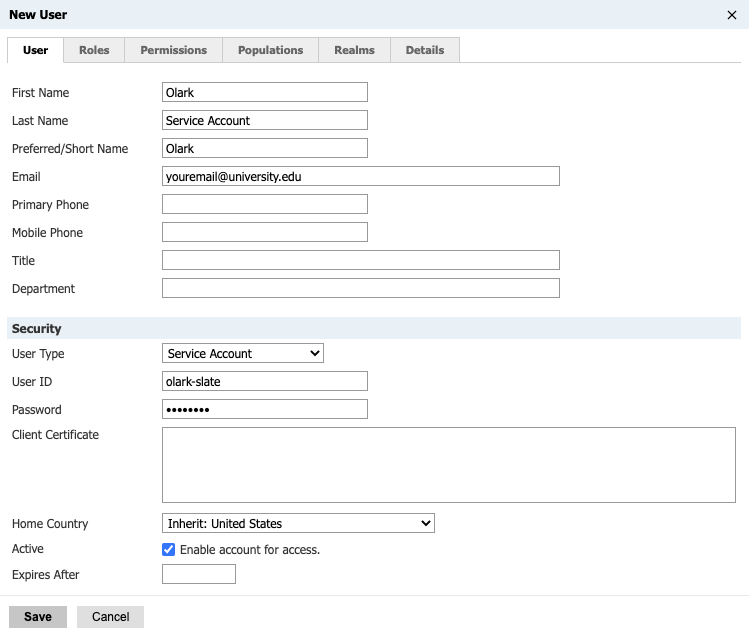
- Click the New User button to make the service account
- Fill in the First Name as “Olark”
- Last Name as “Service Account”
- Preferred Name as “Olark”
- Email field with your Slate administrator’s primary contact email
- Select Service Account as the User Type. Choose a secure user ID and password for the service account. We recommend using “olark-slate-import” to make it easy to remember the purpose of the user account.
- Make sure to check Enable account for access
- Click Save
Step 5 - Set up details related to your Slate instance in Olark
During this step, you will be accessing the Pro chat console and inputting some information about your Slate instance.
-
Have an admin-level user login to Olark.
-
Navigate to the Integrations page
-
Click the key icon next to Slate
-
Enter the requested data for your Slate integration.
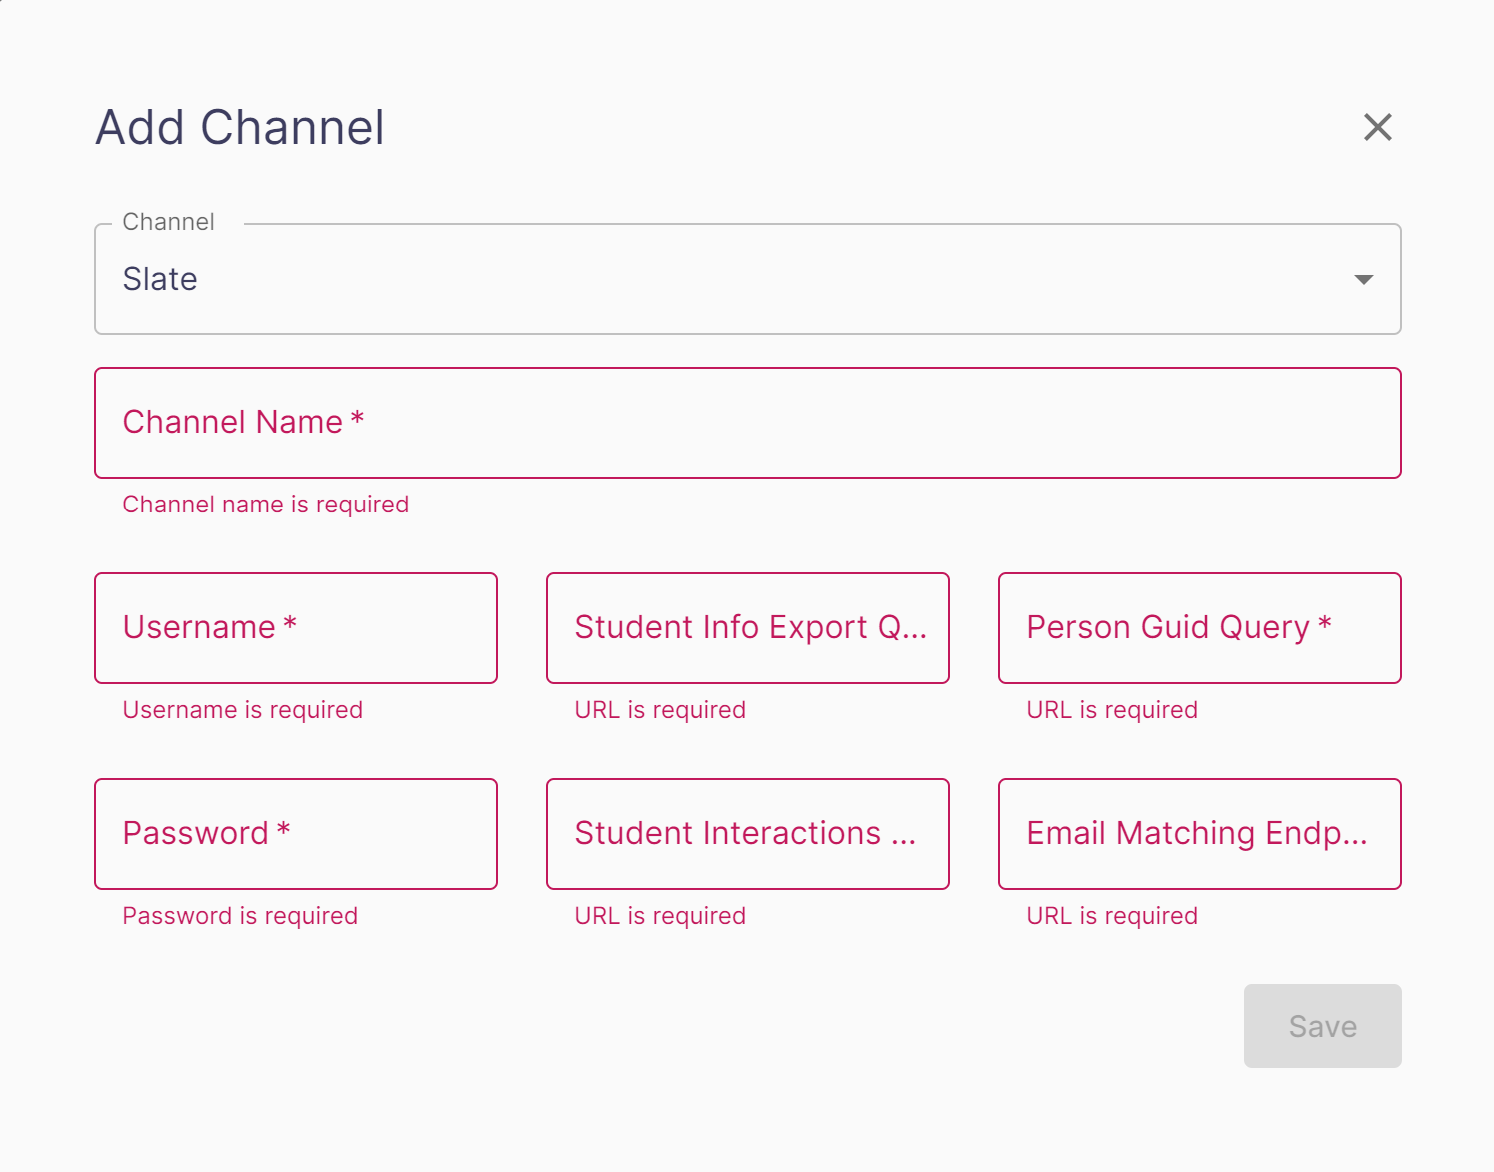
You will need to enter the following information to set everything up in one go:
-
The username and password for the service account that has access to this export and import query. The username and password was created during earlier steps within this guide.
-
The URL for the export query you created to get student information by URL. This should look like:
-
The web services endpoint where we will be posting student interactions:
-
The URL for the person guid query. This should look like:
https://DOMAIN/manage/lookup/search?id={guid}
-
The URL for the email matching endpoint. This should look like:
https://DOMAIN/manage/lookup/search?q={email}
-
Select the Save button after entering all of the information listed above in their appropriate fields.
Step 6 - We’ll send in sample data that you can Remap in Slate
We’ll create your custom Slate integration on our side, and send some test data over while we are chatting on Zoom or on a shared Slack channel. Once this test data is sent in, we can work together to map the fields from Olark into your Slate instance.
How to see the pending web service imports (test data) from Olark :
- Go to the Database page
- Select Sources / Upload Dataset
- Click Source Formats in the sidebar
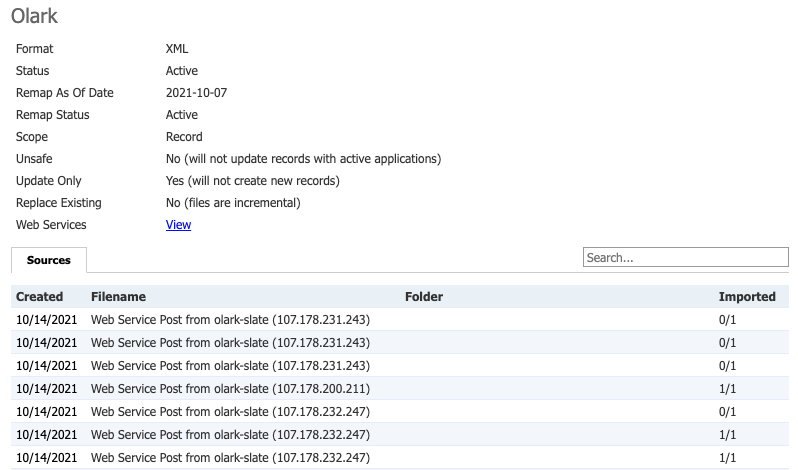
- Select the Olark format
Here you can see the web services imports:
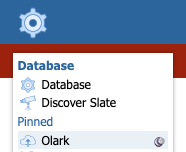
Note: While implementing, you may want to pin the Olark source in the Database tab for easy access.
To speed up imports while testing:
While on the call with your Olark rep, you can speed up Slate’s automatic 15-minute import interval. On the Database page, select Force Process Import. (Since this will run all pending imports, you may want to check and make sure you don’t have any large imports pending prior to the call.)
Remapping the fields:
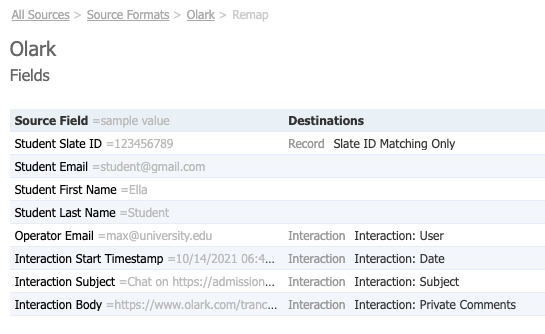
Once Olark has posted data for the first time, you’ll be able to remap. In the Olark Source Format, click the Remap button. Map to the following standard Slate fields:
Source Field =sample value -> Destination
- Student Slate ID =123456789 -> Record - Slate ID Matching Only
- Student Email =student@gmail.com -> (Do not map)
- Student First Name =Ella -> (Do not map)
- Student Last Name =Student -> (Do not map)
- Operator Email =max@university.edu -> Interaction - Interaction: User
- Interaction Start Timestamep =10/14/2021 06:4… ->Interaction - Interaction: Date
- Interaction Subject =Chat on https://admission… -> Interaction - Interaction: Subject
- Interaction Body =/tranc… -> Interaction - Interaction: Private Comments
In Slate, it will look something like this:
Remapping Olark operators to Slate users:
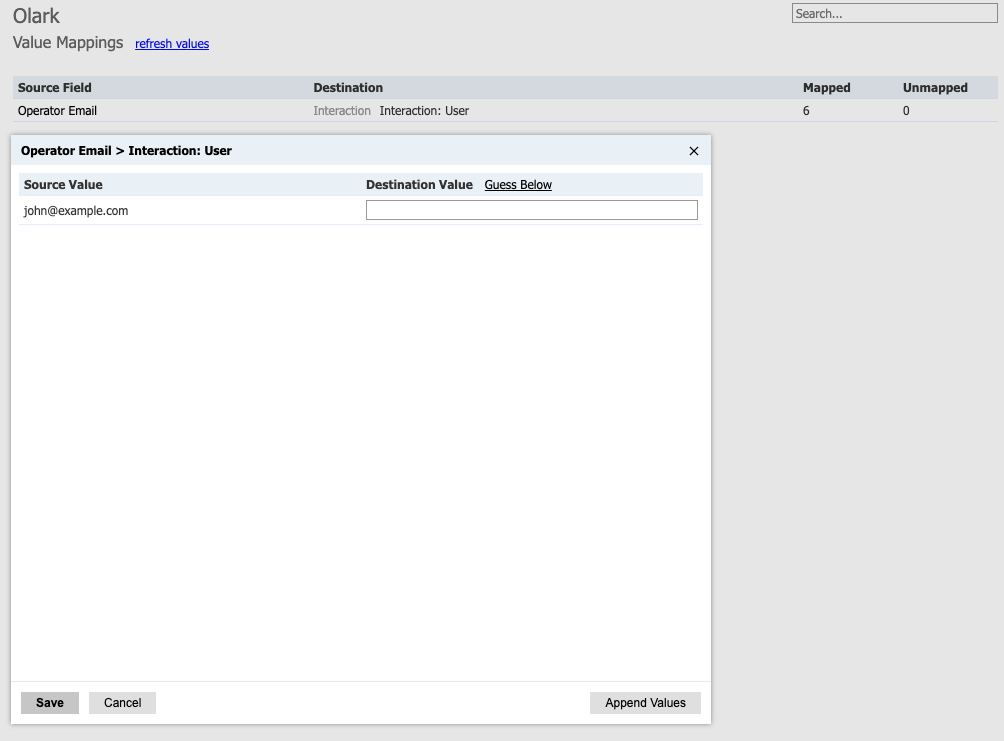
Value Mappings:
- In the sidebar, select Value Mappings
- Click the Interaction: User mapping and make sure all possible Olark operator emails are mapped to Slate user accounts. You can get a list of your current Olark operators from the Olark team page.
- Use the Append Values button at the bottom of the popup to add emails to the list.
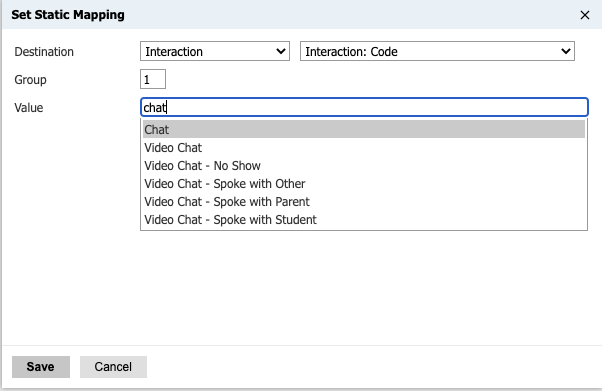
Static Mappings:
- In the Static Mappings section, click New Static Mapping
- Select Interaction as the destination and then Interaction: Code
- In the Value field, type the name of the interaction code you created earlier, select it from the suggestion list, and then save (Your interaction code name from Step 1 will likely be called something like “Chat”.)
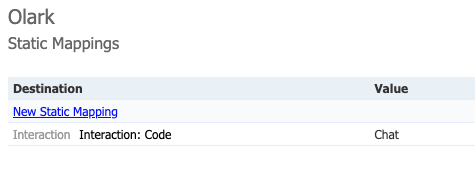
Your static mapping should look similar to this:
Activate the Remap when all the mappings are in place:
- Return to the main view of the Olark source format
- click Edit
- Set the Remap As Of Date to today
- Set the Remap Active to Active
- Save

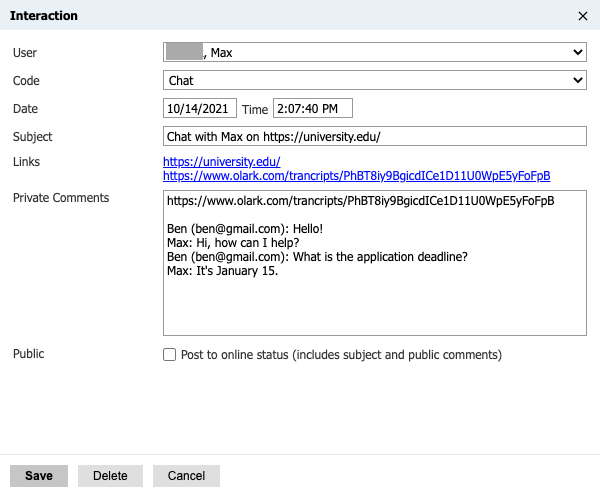
Once this is done, you can navigate to the user linked to one of the records you just populated from the Olark interactions import, and see the chat show up on the student’s timeline.

When you click on this chat, you will see additional details like comments and transcript:
Step 7 - Testing before going live
Run the Slate integration from your test environment for a few days and let Olark know when you are ready to go to production.
To go to production, repeat the above steps 1 through 8 with your production instance of Slate, and coordinate with our team to set up a time to verify your setup. Since you’ve already done the steps once, the process will be mostly identical and go pretty quickly. To ensure there are no delays in getting the imported data Remapped, give us a little bit of notice to make sure we are available to push in test data when you need it.
Step 8 - Celebrate! You are all set
Congrats, you’ve now integrated Slate with a powerful new tool! Your data team can now run reports on Olark inside of Slate’s interface. Your Olark agents and admissions counsellors can save time with direct links to Slate student records and all Olark history appearing on student timelines.
Step 9 - Talk to us about how we can streamline things even more.
Reach out to your account manager if you have feedback or requests. Improving automation for higher education customers is a key priority for Olark. We’d love to understand how we can make your workflow more efficient, and help you get all the data you need in one place. Olark integrates with a variety of analytics and automation platforms, and our CoPilot chatbots can be tailored to your exact use case, including financial aid, student services, admissions counseling, housing, and more.
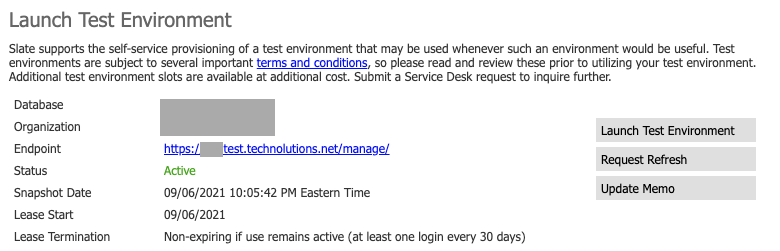
Appendix: Refreshing your test environment
We recommend refreshing your test environment if you haven’t done so in the last month. Using an out-of-date test environment means using outdated data, which can result in (among other things) missing student contact records to align with your Olark chat data.
Important: Before updating your test environment, check with other Slate users to make sure there is no unsaved work.
When you’re ready, go to the** Database** page and select** Launch Test Environment** . Click the** Request Refresh** button and submit your request. The process of updating your test environment with the latest data from Production normally takes a couple of hours.